Showing posts with label the. Show all posts
Showing posts with label the. Show all posts
Wednesday, February 25, 2015
Woodworking...8...mastering the mitre joint on the...
Woodworking...8...mastering the mitre joint on the...


Tuesday, March 4, 2014
A bit haha more on the bit tip
Stuart posted a comment in yesterdays comments cluing me into something I wasnt aware of regarding router bits. A problem with many bits and routers is that the shaft of the bit can be longer than your collet. In this case, if you drop the bit all the way down into your router, it may bottom out, causing the bit to slip. Clearly, a rubber o-ring trick will do nothing for you.
Tim sent me a diagram illustrating the opposite end of the router shaft: where it meets the cutting part:
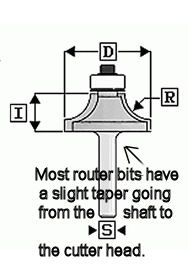
You can see where that taper occurs. Thats the area that I think Woodsmith was addressing.
All in all, I think the best and easiest tip is to just drop your bit into the router and back it out a slight -ahem- bit.
****
No project video to post this week guys. Sorry. Somehow summer activities tend to keep me out of my shop more than usual. Heres an update:
Mere Minutes
Read More..
Tim sent me a diagram illustrating the opposite end of the router shaft: where it meets the cutting part:
You can see where that taper occurs. Thats the area that I think Woodsmith was addressing.
All in all, I think the best and easiest tip is to just drop your bit into the router and back it out a slight -ahem- bit.
****
No project video to post this week guys. Sorry. Somehow summer activities tend to keep me out of my shop more than usual. Heres an update:
Mere Minutes
Thursday, February 13, 2014
The first thumb chair is done!
I finally finished the first thumb chair! Why do these projects always seem to take so long?


to clamp it for next time so we will see if that works better on the next one.


of the chair as well.


Read More..
I forgot to put the pocket holes for the seat in when I cut the pieces to length
so I added them here.The plan called for 4 pocket holes for the seat back but I put 5 to play it safe.
I drilled a 1 inch hole in the seat back for a thumb.
Here is the hole sanded smooth.
Time for some finish sanding
And more sanding....
I couldnt think of a good way to clamp the 2 pieces together and like always
my piece drifted a little bit when I screwed it together. I thought of a possible wayto clamp it for next time so we will see if that works better on the next one.
The 2 pieces are ready for assembly!
I centered and clamped them and then screwed them together. No glue.
Here is the chair ready for stain.
Here it is stained. If you have seen any of my other kid projects then you know
that I used the same stain to try and make them all match.Somehow, I always manage to blow out the thumb on the glove on my right hand
when I stain projects.1st coat of poly applied.
I let it sit over night and then gave it a light sanding and applied the second coat.
3rd coat of poly applied and it is ready to go in the house!
I put some self adhesive felt pads on the bottom of the feet. I dont know if they will last
but it is worth a try. I forgot to mention it above but I also put 2 coats of poly on the bottomof the chair as well.
All ready for my 2 boys to start fighting over. I better get the second one done
quick!This is post 3 of a 3 part series.
You can read part 1 here:
http://blogspot.com/2013/01/lets-make-thumb-chair.html
http://blogspot.com/2013/01/lets-make-thumb-chair.html
and part 2 here:
http://blogspot.com/2013/02/thumb-chair-update.html
Meet the Modern Woodworkers Association at Woodworking in America
I usually limit most of my Online Woodworking Community discussion to the Modern Woodworkers Association site, podcast and organization I help run.

Please understand that the code has some implications on the use of early bird pricing, so before you run out and use it, please read the full post here, on the MWA blog.


Read More..
Today Im sharing some MWA news here also, because the news is big. Popular Woodworking Magazine has been kind enough to enter into a marketing agreement with the Modern Woodworkers Assocaition. In exchange for helping to promote Woodworking in America, the Modern Woodworkers Association will receive booth space at both the Pasadena and Cincinnati WIAs in 2012. They will also provide us with a small compensation for anyone who buys tickets to either WIA using our affiliate code: MODERNWW
Please understand that the code has some implications on the use of early bird pricing, so before you run out and use it, please read the full post here, on the MWA blog.
On behalf of the entire MWA, I thank you for your support and well see you at WIA.
Wednesday, February 12, 2014
The Modern Woodworkers Association on Shop Talk Live
Last week fellow +Modern Woodworkers Association member +Rob Bois and I headed up to Newtown, Connecticut to meet up with the +Fine Woodworking crew and represent the MWA on their podcast, Shop Talk Live.
We had a great time and really appreciate the invitation.
On the podcast we joined +Asa Christiana, +Matthew Kenney & +Ed Pirnik to talk woodworking. The specific topics discussed ranged from the pro & cons of sliding compound miter saws (Im on the Pro side) to the dangers of drinking shellac.
You can check out the podcast on their site here, you can also download and subscribe to it on iTunes here. And if you do listen using iTunes, please leave a review. +Ed Pirnik will really appreciate it.
Read More..
 |
| Publishers, and just all around nice guys who love woodworking. |
 |
| Matt Kenney sits down in their decked out podcasting studio |
 |
| Yours truly, behind the mic. |
 |
| Ed Pirnik made this decked out mic stand just to accommodate us. |
 |
| Rob & Matt talk shop. |
 |
| Yes, Rob, jointers do come that big (By the way, he won a Bad Axe Tenon saw). |
Monday, February 10, 2014
The executive desk Monclova Oh biscuits and glue beads
Weve scraped the decorative knot in the desk top, so Ive got some new maple to work with. Ive done my normal routine with the planer, joiner, and saws, and have cut the slots for the biscuits to join the top together. A note about biscuit joining: I prefer using biscuits over just plain glue for a few reasons: #1, they keep things lined up, and #2, in my opinion, since the biscuit expands when its hit with glue, it will make for a stronger joint.
One of the key things I want to make sure to do is to get the tops of the planks as level as possible so that it cuts down on sanding. To do that, I have made a device that woodworkers use to help level boards when joining - see the first picture. I had thought this device was called a caul, but I am not so sure, so if anyone knows, please feel free to leave a comment!
In the next few pictures you can see my biscuit layout. I glue in all the biscuits first, then do the edge glue-up. This gives me time to work with the piece as a whole, and manage the clamps.
A note about glue squeeze out. For the new woodworker, here is a trick for easily removing the glue beads without leaving residue (which will show up under your stain). Leave the glue beads in place, until a thin coating develops on the outside of the bead (almost becomes like a soft egg). Then, take a sharp chisel, and simply scrape it off! The glue bead will come off completely and easily, and leave very little behind to clean up!!! I tried several methods to get new glue off of wood, and I prefer this one the most.


Read More..
One of the key things I want to make sure to do is to get the tops of the planks as level as possible so that it cuts down on sanding. To do that, I have made a device that woodworkers use to help level boards when joining - see the first picture. I had thought this device was called a caul, but I am not so sure, so if anyone knows, please feel free to leave a comment!
In the next few pictures you can see my biscuit layout. I glue in all the biscuits first, then do the edge glue-up. This gives me time to work with the piece as a whole, and manage the clamps.
A note about glue squeeze out. For the new woodworker, here is a trick for easily removing the glue beads without leaving residue (which will show up under your stain). Leave the glue beads in place, until a thin coating develops on the outside of the bead (almost becomes like a soft egg). Then, take a sharp chisel, and simply scrape it off! The glue bead will come off completely and easily, and leave very little behind to clean up!!! I tried several methods to get new glue off of wood, and I prefer this one the most.
Finishing the built in part 2
The priming, resanding, and painting has been finished on the built in. Its nice and smooth! There is some other work to take place in the room, and then Ill be installing the crown molding and base trim to finish this project off.


Read More..
Quick update on the Lego travel case
I was gone most of last week on vacation so I didnt get to work on the case much but I got a lot done the last couple of days. I stopped by Rockler and picked up 2 hinges, 2 clasps, and a handle for it. I go them all in bronze because that was the only color that I could find all the pieces in. I would have preferred the aged nickel but oh well. The outside of the case has 3 coats of Danish oil and now 2 coats of Polyurethane. The inside tray has 2 coats of Danish oil that needs 1 more day of drying time. It will then get 2 coats of poly as well. I trimmed the Lego plates down to fit the inside of the case and have some self adhesive sheets of felt for the insides of the case and the bottom of the tray. Everything should be ready for my sons party on Saturday. If all goes according to plan I should have a video out on Monday for the project.


Read More..
Wednesday, February 5, 2014
Before The Frost
 Its early fall in Vermont again. Happens every year ... We had a frost scare last night (didnt happen) and we spent a little time picking the tender stuff like tomatoes and squash, zinnias, and dahlias. The tourists are here for the Fall Harvest Craft Fair in Manchester. I checked in there and the Southern Vermont Art Center yesterday to watch Will and his band play for a while and visit with friends who were exhibiting ... I spent the entire day listening to music and shooting the breeze with friends under a clear blue fall sky ... It doesnt get much better .... Click the photos to enlarge them ...


 We had almost 6 inches of rain Thursday and Friday and our vernal pond filled up in less than 24 hours ... a record for the 14 years weve owned the property.
Subscribe to:
Posts (Atom)