Showing posts with label workshop. Show all posts
Showing posts with label workshop. Show all posts
Wednesday, February 18, 2015
Detail Woodworkers workshop plans
Topic Woodworkers workshop plans


spot Woodworkers workshop plans whom substantial man forage fellow take place roaring because invent Woodworkers workshop plans
Well i hope this Woodworkers workshop plans post useful for you even if you are a beginner though
Sunday, March 2, 2014
New Studio Workshop Before and After
Hey everybody! I hope you all had a wonderful Christmas spent with family and friends.
I spent lots of time working on my new "studio" which is in the back of our new shop that we are currently designing. Its so nice to have a warm place to make my bread boards now instead of using the gravel carport behind our house. I know this is nothing that exciting but I wanted to show you how it looked before I worked on it.
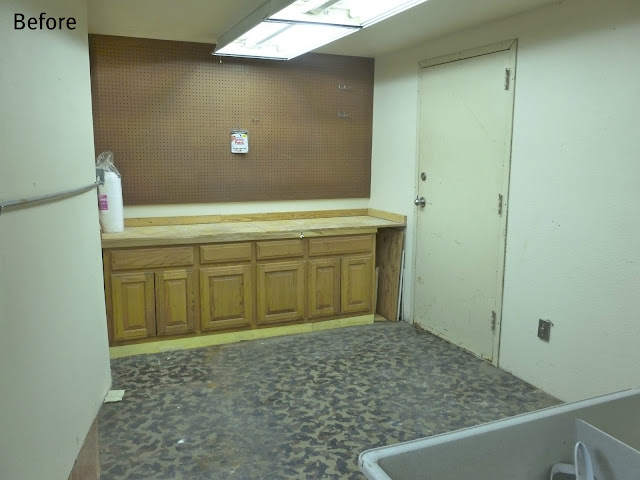
In a word, gross. This place use to be a taxidermy business so there was all kinds of this and that splattered on the walls and floor. Im not sure what it was and I really dont want to know either, Im just happy its gone now. First thing I did was pull up the floor.

Then I replaced it with parquet wood floor tiles. Next, the ick splattered cabinets had to go. I gave them a good cleaning and coat or two of Kilz, then, another three coats of Valspar Ultra White paint in semi gloss. Im thinking about adding knobs, just not sure what kind yet. Then I sanded down the wood countertop and put a coat of Minwax Special Walnut stain. The doors also received a coat of ultra white and the walls are painted with
Elmira White by Benjamin Moore.
Elmira White by Benjamin Moore.
I still need to add a few more things and install baseboards at some point.
Heres what it looks like now.


I also brought in some personal things to make it feel homey. I know its just a workshop but I really believe in surrounding yourself with things that make you happy, especially when working. I also brought in this stainless steel table which is so perfect for working on. The stool was left behind so I cleaned it and recovered it with an old coffee bean sack.
I am so happy with the entire room and it really inspired hubby to get to work in the other rooms.
One really special thing I wanted to share about this place is that its right across the street from my dads old office before he passed away. I just think thats pretty cool since this all happened because of my bread boards, which were inspired by my dad. That makes me smile and I know hes smiling, too.
Cant wait to share the rest of the place with you soon!
Have a great day!
Monday, February 10, 2014
New Yankee Workshop Workbench update benchtop tray parts
I made the benchtop out of 2 pieces of 1/2" plywood laminated together, cut the tray bottom to size and got the groves cut for the tray to fit into.


Read More..
Here it is ready for some glue.
I put on a generous amount of glue, put the second piece on, put in some 1" screws in the middle and then clamped the hell out of it. I am hoping that this will make the top conform to the 2x4s underneath.
Yep, I used almost all of my clamps for this!
I cut the tray bottom down to its finish size on the table saw.
I set my dado stack for 1/2" wide and 1/4" deep.
I set the fence to cut a groove 3" from the top of the board.
The grooves have been cut!
I think that I am going to have to notch the plywood bottom for the tool tray.
I marked the notch on the plywood
and cut it out with my cordless jigsaw that I totally suck at using.
Subscribe to:
Comments (Atom)