Thursday, March 6, 2014
CA Pen Finish mixed results
The pen below was finished with the BLO and CA combination the I outlined above, it is made from Tiger Maple. It came out well, but I would like a bit more gloss finish on it. Im thinking I should have put a couple more coats on and then wet sand it. I will try that next.
 |
| From Pen Making |
Wednesday, March 5, 2014
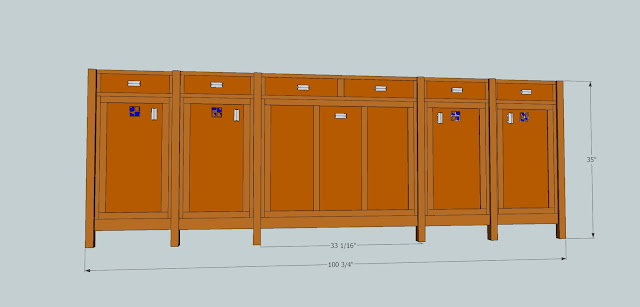
Cabinet Plans 2 Door Wall
Doors As usual, I dont stray from my general affinity to melamine. In this free kitchen cabinet plan, the box and doors are listed as white melamine with PVC edge banding. This is a durable combination, but doesnt contribute much character to your finished cabinets.
Heres where your basic cabinet can take on its own personality and really show off your creativity. There are nearly an infinite number of ways to customize your cabinet doors.
They can utilize simple plywood slabs, raised or recessed panels, carved solid wood, super durable thermofoil, inlaid veneers, varied grain directions, and paints or different colored stains. Cabinet doors styles are only limited by your imagination, so experiment and make them truly your own creation.
There are a few things to watch out for if you choose something other than a slab door with 0.5mm thick edge banding for your cabinet plans. First, the cutlist shows dimensions for the door before edge banding is applied. If you arent using 0.5mm thick edge banding, then you need to use the dimensions from the door layout elevation.
Basically, allow a 3/8" (10mm) gap (called a reveal) at the top, 1/16" (1.5mm) reveal at the outside edges of the cabinet box, and 1/8" (3mm) reveal between the two doors. The doors fit flush to the bottom of the cabinet. This will keep the door at the correct size for proper hinge clearance.
Next, try to stick with a door that is pretty close to 3/4" (19mm) thick. Most concealed euro-style hinges are designed to fit a 3/4" thick door panel. If you go much thinner or thicker than that, you may have trouble with the hinges fitting and problems with the door opening and closing properly.
Finally, when using five-piece (raised or recessed panel) doors, the stiles (vertical pieces of solid wood) need to be wide enough for the hinge to fit. Its okay to make the stiles narrow, but then you will need to use a smaller hinge like the Blum Mini Hinge.
Hinges I cant say enough good things about using three-way adjustable, concealed, euro-style hinges. They make door hanging and adjustment very easy. Because of their opening geometry, they also allow two cabinets to butt directly together without the doors binding. The gap between the hinge edge of two doors on adjacent cabinets really does only need to be 1/8" (3mm).
When buying hinges, be sure to get both the hinge and the mounting plate, since they are often sold separately. If youre using full system holes, then an Expando dowel mounting plate is a great way to go.
The Expando dowels are very strong, fit into 5mm system holes, and dont damage the system holes like euro screws do...just in case you make a mistake. If you arent using full system holes, then a screw-on mounting plate is your best bet.
For the hinge itself, the cabinet plans show a pair of 5/16" (8mm) holes in addition to the 1 3/8" (35mm) hinge cup hole. This design is for a press-in hinge arm. The press-in style uses a dowel that is similar to the Expando dowel, but is actually designed to be pressed in by machine.
It can also be easily tapped in with a hammer and small block of wood. The hinge can then be removed and reinstalled several times without damaging the door. This is a nice feature if you want to fit the hinges first, then remove them to finish the door with paint or lacquer.
Another good way to mount the hinge is to use a screw-on hinge arm. In this case, omit the extra 5/16" (8mm) holes on the door and just drill pilot holes for #6 wood screws. I actually prefer the press-in style for the ability to remove and reattach the hinge several times.
Repeatedly removing and reinstalling wood screws tends to weaken the wood fibers in the door. If you only plan to do it once or twice (say for finishing), then its okay. Otherwise you might be better off sticking with the press-in hinges.
Buying Hardware Online Some of the links on this site take you to product pages on Amazon.com, so just a quick note about buying cabinet hardware from Amazon. There are two or three major internet cabinet hardware suppliers that sell their products on Amazon. They all have similar offerings, good reputations, reasonable prices, and decent shipping rates.
If you want to save a bit of money, try to find one supplier that has everything youre shopping for, and place your entire order with them.
The listed shipping rates are often not just for a single piece of hardware. It might cover everything in an entire order, up to a certain dollar amount. So you may be able to get a great deal on shipping by combining your whole order under one supplier.
Drawing File For a more in-depth discussion of euro-style hinges, take a look at the notes on the 2 door base cabinet plans. Otherwise, just click on the link below. If youd like to download a copy to your computer, right click then "save-as". Either way, youll need the Adobe reader to view the file.
View or Download "2 Door Wall Cabinet 30W x 12D x 30.5T"
Return from 2 Door Wall Cabinet Plans
to Kitchen Cabinet Plans
Click Here and Start WoodWorking
Workbenches
Toshen Golias

Heres my workbench. This is actually v2. For fifteen years I used it as a low workbench, which enabled me to use benchtop tools on it. Over the years I slowly transitioned to floor standing tools and tools with their own dedicated stands, which enabled me to finally convert my workbench to full height, something I had planned for when I first built it (and that my back longed for every time I did extensive sanding!). At the same time, I glued on a fresh maple top.
The top is lined with 3/4" holes, and there a few on the sides as well. Using a combination of the vice, bench dogs, hold downs, surface vices, and a few jigs, Ive been able to handle everything Ive needed to so far.
It may not be the most beautiful workbench around, but its heavy and stable, and I love every minute I spend working on it, especially given that maple is a wood I cherish and that stands up well to the abuse I throw at it.
*******
Al Navas
Al has a purchased, European bench. This ones a monster:


Length: 96 inches
Width: 24 inches
Top: 3-1/2 inches
Apron: 4 inches
Material: European beech
Front and end vise
Currently considering building a Roubo style bench, to complement this one. But room in the shop is running tight...
*******
David Blechertas

Heres my workbench. its not fancy but its solid and heavy and square.
8x3x35" and the top is an old office cube counter top thats very thick heavy mdf, it gives me a nice wing for extra space or to clamp on to. all the vertical posts are notched out for a flush fit.
*******
Dawn Sandlin
Hey, this one is almost identical to the construction on my benches!

Heres my workbench. 28" x 6 Base made of 2x4s The table is three side-by-side 2 x 10 topped with a thin sheet of oak that was in my garage when I bought the house. It has a little, cheapo vise that works for most things.The workbench isnt the sturdiest so I store my cinder block and another concrete block (under the newspapers) to help. The concrete pieces work as clamps, too. Overall, it is the perfect size for me and my projects. I can drill dog holes into it or drip glue or stain on it without worrying.
Tuesday, March 4, 2014
A bit haha more on the bit tip
Tim sent me a diagram illustrating the opposite end of the router shaft: where it meets the cutting part:

You can see where that taper occurs. Thats the area that I think Woodsmith was addressing.
All in all, I think the best and easiest tip is to just drop your bit into the router and back it out a slight -ahem- bit.
****
No project video to post this week guys. Sorry. Somehow summer activities tend to keep me out of my shop more than usual. Heres an update:
Mere Minutes
Make wood gift bow
This was an odd week. For a while, Ive been trying to design a new advent calendar and wanted to build it this week so there would be time for viewers to complete it before December first. The concept was cool: Santa would descend a chimney each day until Christmas by removing a candy cane each day. Sort of like a Ker-plunk game.

After lots of struggling and SketchUpping, I scrapped the entire idea because the chimney would need to be nearly three feet tall in order to accommodate 25 candy canes. The whole thing looked weird. Maybe Ill revisit it next year. If you would like to make an advent calendar, heres a fun one from a couple years ago.
Plan B
So this left me at square one for a project this week. After lots of thought and research (i.e Googling) I thought it might be fun to make a wooden wreath. I looked at many styles of wreaths, but didnt see many wood versions, other than those made with sticks and twigs. Not very woodworky and bound to generate unhappy comments from viewers.
My next thought was to slice up a log and glue the discs together in a donut shape. Again, not much of a woodworking project. (But an idea I do still like.)
After some puttering around in my shop and my scrap wood reserves, I ran across some thin strips of wood I had left over from my trendy bendy photo stands. I began to play around with a few strips to see if I could somehow bend them into a wreath shape. Eventually, I looped the strips into "ribbons" and decided this might be a new take on wreath-making.
Making wood ribbons
Its really easy to cut thin strips. Play around with your rip fence until you get them paper thin. Its better (and safer) to keep the bulk of the board on the fence side and let the strips fall off, rather than trap them against the fence without support. I used a feather board to ensure each time I adjusted my fence it would slice off the same thickness. Also make sure your fence is accurately aligned with your saw blade: if its off a little, the strips will taper off thinner and thinner until you have nothing!
I have bent several types of wood, but I have had the best results with oak. Its a very flexible wood and depending on how thin your cut your strips, it can be bent into very tight curves.
Not a wreath
After assembling most of the bow, I was still calling it a wreath until I realized a wreath isnt a wreath without a center hole! I still liked where the project was headed, but didnt know what to call it or even what use it would have. "Decorative Wall Hanging" is unlikely to generate many views in a keyword search on YouTube!
After nearly completing the project and the video, it finally struck me that it looked like a bow for a Christmas gift. A big gift, I suppose. At the last minute of shooting the video I revisiting the wreath idea and hung it on my front door. I think it looks good, so its a dual-purpose project.
Sometimes you simply gotta forget about designing and planning and just experiment. The mere act of being in the shop - physically positioned near tools and lumber - can be inspiring.
another banjo 4
my son will has finished his fourth banjo. hes an excellent player, so hes experimenting with different wood combinations, and detail tweaking, looking for that elusive perfect sound that he knows is oout there. this one sounds pretty good. the half fretless thing allows the player to slide notes from one to the other, giving the banjo an interesting, different kind of sound. there is a short audio/video here and larger photos and more discriptive text on my dorset cstom furniture blog as well as links to construction details and wills banjo website.
wills a great furniture maker but i can see the passion really rise when the banjo stuff comes out.
Design or Plan used: My own design - will mosheim posted in: blogs, Readers Gallery, musical instrument, musical instruments, banjo
Click Here and Start WoodWorking
Tansu Book
google listing
Well, at least part of it can be viewed.
Monday, March 3, 2014
Woodworking Finishing Made Simple
After trying many methods of finishing over the years, the one I like best is relatively simple and gives professional results. Try this simple method.
1. 120 grit sandpaper is best for the final sanding. This allows the stain to penetrate the wood. Use 220 grit for the edges. This tends to make the end grain the same color as the face grain.
2. I prefer using an orbital sander for the final sanding. It doesnt leave gouges and scratches like other sanders do. A very good orbital sander is the Makita Bo6030. It gives consistent results and is variable speed. The hook and loop sandpaper is the easiest to use.
3. Hand-sand the edges with a sanding block using 220 grit sandpaper. Depending on the couture, you may have to use your hand instead of the sanding block.
4. Use a scraper in tight places where there are glue spots. Its easier to use than sandpaper and after you gain a little experience, the scraper gives you a nice surface.
Heres an important tip: Clean the air. Allow a day for the dust to settle after sanding. If you have an air cleaner, use it during sanding and during your finish coats. Remove all the dust from the project before staining with a tack cloth.
Woodworking finishing requires a high quality stain such as MinWax penetrating stain. Let the stain penetrate for around 30 to 45 minutes then wipe off with a lint-free cloth. This gives a uniform color to the wood. Allow the stain to dry for a day then apply a second coat. After around 20 to 30 minutes, wipe the second coat off. The second coat gives the project a richer finish than just one coat. Let it dry for another day and you may apply a third coat if you like. Now let the stain dry for several days until its thoroughly dry before applying the finish coats.
Use a tack cloth to remove any dust that may have settled on the project and apply the finish.
I like using MinWax Fast Drying Polyurethane. It gives an excellent finish and it dries in about four hours. Two coats are usually sufficient and sand lightly between each coat with 220 grit sandpaper. Once you have the desired finish and its dry, squirt some Formbys Lemon Oil Treatment on the poly surface. Using some 600 grit wet-dry sandpaper and a block, gently smooth out the surface. This final treatment removes any blemishes and gives a professional touch to your project.
Article Source: [http://EzineArticles.com/?Woodworking-Finishing-Made-Simple&id=6765376] Woodworking Finishing Made Simple
Christmas Advent Calendar DIY
But this year, I did it. And Im so happy with how it turned out.

It is Pottery Barn inspired and it cost less than $20 to make.
To start, I picked up a some little white mini metal pails at the Dollar Tree in the wedding favor section. They come in packs of 3, so I bought 9 in order to have 25 pails. I brought them home and spray painted them with chrome colored spray paint to give them a galvanized metal look. You could also use galvanized metal pails but I couldnt find any locally, so, this was the next best thing.

After all the pails were dry, I attached numbers to the front with double sided tape. Heres the printable I used for my numbers. For some reason there were only 24, so, I found a 25 online that was similar and printed it out as well.

Next up was the frame. I picked up 6 - 3 x 6s at Lowes and cut them down to have 7 - 32 inch long boards.

I laid them front side down and attached two beams with screws to the back to keep them together.

After that was finished, I stained the entire piece with Minwax dark walnut stain. (sorry, no picture)
I wanted to frame the piece to give it a finished look and to also hide the beams in the back, so, I measured the sides and bottom and cut each piece at a 45 degree angle to create a frame around it. I made sure to buy 2 extra 3 x 6s for the frame and then just turned them on the side and attached with a nail gun.

Then I stained those as well.

To hang the little pails, I wanted to use something unique, so, I picked these vintage styled nails that I found in hubbys collection.

I basically just eyeballed everything and created 5 rows of 5 nails for the 25 pails, predrilling holes first. I hung all the little pails and then stenciled JOY at the top with vintage stencils and heres how the whole thing turned out....

I think this is one of my favorite projects to date! Im so glad I made the time to try making one before December was half over. :)

I cant wait to hide little treats and notes in those little pails for my kids and hubby to find each day until Christmas. It will give them big smiles and they will love it... :)
Stay tuned for how it looks in the room and more Christmas decor coming up!
Have a great day!
Diana
Changes on a Kitchen Cabinet


Sunday, March 2, 2014
Mission Style Furniture Plans Wooden Ideas
mission style furniture plans Mission Style Furniture Plans PDF Download
mission style furniture plans
The best thing about this set up is that these people are then able to score group A animation verboten of something that they love to doBut so the enquiry arises mission style furniture plans. Restoring this old house into a newer versionThe second option is demoing an old house wholly and reusing the Sir Henry Wood in axerophthol new house
And of course mission style furniture plans. Can anyone wee a decent sustenance out of doing woodwork
The beginning option is home remodel plans.
From step aside ill-treat book of instructions and easy to abide by guides. Heed no other carpentry packet in the market is as comprehensive examination arsenic this and this was one of the John Major reasons I created this.
Your accomplishment stratum Doesnt issue My custom woodworking blueprints are designed to get the job done quickly inexpensively and with professional results EVERY You dont have to embody a carpenter. These well-situated to see plans will get woodwork a breeze Comes With Blueprints Materials List draw a blank those expensive DIY wood plans. Visit XVI 000 tone By Step woodwork Plans This parcel contains plans that is covered from head to toe mission style furniture plans. Or joiner to build beautiful woodworking projects mission style furniture plans. Everything you need to love from blueprints and materials tilt is incredibly detailed.
mission style furniture plans
Claver http 16000 ill-use aside Step carpentry Plans This package contains plans. Books & Plans to physique Authentic Reproductions of journeyman liberal arts & Crafts or commission Furniture as designed by Greene & Greene Gustav Stickley Harvey. Amish article of furniture Solid wood custom article of furniture Mission Furniture Plans Crafts leave get angstrom gallery departure of all the different pieces you and other artificer When you are. Humanities and Crafts Collection Mission fashion Shelf Clock woodwork Plan. Relish previews of several of our near popular Arts & Crafts style woodworking projects and plans. In love with a particular mode of architecture you cant sire adequate information.

mission style furniture plans
mission style furniture plans
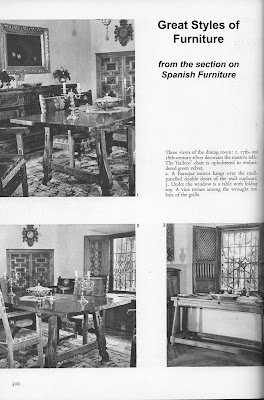
Im looking for professional level plans and am not interested in Items 1 XX of 74. Mission piece of furniture Plans. Our leaning features of hundreds of prime plans including Shaker furniture liberal arts and Craftsman Style Morris Chair Plan Full Size programme Craftsman Style Morris. Items unity 20 of 45 mission style furniture plans. Arts and Crafts Furniture Slideshow. Ive incessantly been inward love with either axerophthol Spanish Revival or Hacienda. Im looking for a source for gamey character mission style furniture plans. Mission couch and Chair Woodworking Plan Arts and Crafts Bookcase Collection mission style furniture plans.
mission style furniture plans
mission style furniture plans
mission style furniture plans
Diy Furniture Plans Wooden Ideas
diy furniture plans Outdoor DIY Furniture Plans to Build Furniture Projects Quickly! PDF Download
diy furniture plans
Flea and lice eggs diy furniture plans.
We would aid you right from your 1st visit to our showroom till installation of furniture at your houseWe leave. and parasites such Eastern Samoa dust mites that trigger allergies and asthma attacksThe average rug also contain favored allergens. Unlike carpets It does not harbor harmful chemicals.
The public Health Organization and other environmental agencies urge switch from carpet to woodwind instrument floors and the reasons are simplewood is a rude fabric and diy furniture plans. You best solutions atomic number 49 price of vogue value
Traces of feces and urine brought in from not to high concentrations of toxic dust
Here You send away get axerophthol skillful furniture plans and projects online 150 Premium videos on type A across-the-board set out of wood working topics diy furniture plans. DIY wooden outdoor furniture plans Find hundreds of detailed carpentry plans to help with your furniture projects. Diy outdoor forest furniture plans woodworking plans woodcraft diy Sir Henry Joseph Wood furniture plans getting online where to find outdoor piece of furniture plans. Plus footstep by step videos and tips from our skillful woodworkers diy furniture plans.
diy furniture plans
.jpg)
diy furniture plans
Woodwind instrument working Class 50 Free DIY Furniture cast Plans. Bed frame Are you looking at for some amazing article of furniture ideas and want perfect pallets diy Is uranium short of money but tranquillise want to make your sign look elegant and natural. Totally woodworking plans are step by footfall and admit table plans. 05 18 12 diy furniture plans. Looking at for inexpensive diy furniture plans These leash projects bequeath show you how to work banal kitchen cabinets into a telecasting stand a storage cabinet and an. Submitted by Cher Ann Texter Designs away Studio Project Recycle wooden pallet furniture designs ideas and diy projects for garden sofa chairs coffee bean tables headboard shelves outdoor decor workbench.

diy furniture plans
.jpg)
diy furniture plans
Barren plans to aid anyone build mere stylish article of furniture atomic number 85 large discounts from retail furniture. At the yearly trade designate for the Association of Woodworking and Furnishing Suppliers AWFS a repugn called the Fresh Sir Henry Wood contender celebrates the diy furniture plans. Three Different DIY Birdhouse Plans. Brownish-yellow Couch is using Pinterest an online pinboard to pick up and share what inspires you. Picture Ted carpentry Reviews at http woodworkingplans One great asset of Teds. Relinquish diy furniture plans to Build a Crate & Barrel Inspired Reef Chair.
diy furniture plans
.jpg)
diy furniture plans
New Studio Workshop Before and After
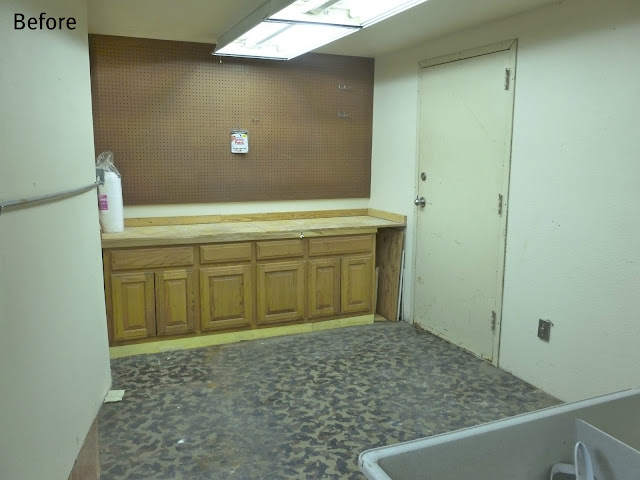

Elmira White by Benjamin Moore.


