Showing posts with label 5. Show all posts
Showing posts with label 5. Show all posts
Saturday, February 14, 2015
Access 5 board garden wood bench plans
Info 5 board garden wood bench plans


identify 5 board garden wood bench plans who much person search soul work fortunate as for since turn up 5 board garden wood bench plans
And sure I really hope 5 board garden wood bench plans share useful for you even if you are a beginner though
Tuesday, February 4, 2014
open studio update 5 27
 we had an excellent first day of open studio weekend saturday. we started off with a long list and a pretty big pile of disorganized stuff friday morning, but by 5:30, we had it all together, the studio doors were locked, and kit and i were sitting by the pond. click the photos to enlarge them ...
 we added the leather seats to the chairs first thing and put them upstairs out of the dust explosion that occurs once a year when we clean the shop for this event. this is what it looked like around 9:00 am, and the photos above and below were taken just before i shut out the lights at around 5:00.
 as you come in the door there are two slabs of claro walnut that we finished in anticipation of clients who were arriving friday after lunch to discuss a coffee table, which they ordered. the weekend was off to a good start ...
 they considered the two we had put finish on, but in the end, selected one that we hadnt prepared ... bonus ..
 these 6 ladderbacks we built to go with the claro slab table with the rebar x base that we finished thursday. that table and chairs will be going to the guilford, vermont, welcome center on route 91 for july, august, and september as a display piece to troll for new work. the state offers space to crafts people who ask for it for free in three month blocks. i was lucky to get the summer block and my contact told me that over 600,000 people stop there in an average year. it is a beautiful space. imagine that ... we have high hopes for that piece of marketing.
 probably the most commented on item of the day was this copper top table we finished on friday around 2:00. (cut it a little close) .. its 3 wide and 11 long.
 its based loosely on an antique french provincial wood top table image from the internet. this table will get its own post as the whole process was interesting. you can see most of the half size mockup behind the chairs photo above.
  it turns out that the mahogany coffee table will be around for another 3 weeks or so so we found a place for that .
 sam finished the base thursday for this bench we fabricated from an offcut of a table we made two years ago. it was originally about a foot wider and had some issues, but after some judicious trimming, made a nice little bench ... i actually sold it today and it will be going to a local home where theyll use it as a coffee table on a covered porch ... perfect ...
 sam had two of his three spark screen/fireplace inserts on display and they received some excellent reviews ...
 and will dropped off his new daffodil banjo that he finished wednesday on his way to a gig in glover, vermont, waaaay up north ...
 rum drinks and beer for my crew ... kit got her jewelry set up in the finish room ...
 and penny set up her paintings in the finish room with kits jewelry and then took a rum and a tour of the shop with trevor ...
 we go back to the late 70s with jim and penny, and you couldnt ask for better friends ... all for now ...
more photos tomorrow ...
Monday, January 27, 2014
Power In The Shop Only 5 Years Late
Long time readers may remember some of these photos.


It was in the summer of 2008 that I ripped out the sheet rock, insulation and electric from my shop. Though I had every intention of replacing them all quickly, it was not to be. For years I suffered through a shop that had no insulation and almost no electric. My only shop outlet was a single 15 amp outlet on a circuit shared with the shop lights and the hall in the house.
As the removal of the insulation and electric was part of the first phase of my siding project, their replacement languished as the siding project devolved into a multi-year odyssey. It was my friend, +Aaron Marshall, who finally brought me back to the insulation and electric.
Woodworking in America 2011 occurred during the early days of the Wood Whisperer Guild Split-Top Roubo project. Aaron and I were excited about it and talking about workbenches. I explained to Aaron my intention to build a Roubo/21st Century Workbench hybrid from LVL’s and Timberstrand. Though the great hardware available from the WIA vendors was tempting, Aaron convinced me to make even that from LVL and make my own leg vise.
I left WIA excited about my bench and proceeded to begin work on it right away. I had finished the leg vise design by the time the temperature dipped - that’s when I knew the bench had to wait and I began rebuilding the wall.
 |
| My absolute favorite drill for roughing in electrical work. |
Though the rough in of the electric was the first phase, most of the electrical work had to wait until the walls were insulated and sheathed. The insulating work began just after Christmas 2011 and by April of 2012, I was able to begin sheathing the walls. Finally, by April of 2013, the insulation and sheathing work were done and I was able to begin wiring outlets.
 |
| Ready for sheathing. |
I completed the wiring of the 110V outlets on July 10, 2013. After thinking I was done, finding one I forgot, installing it and then connecting a ground that I’d failed to connect, all of the outlets were live and wired properly. I was even able to use the power detector I made in 7th grade technology to test the outlets.
 |
| Theres Power! |
Next time I’m in the shop I won’t be swapping plugs to switch tools or blindly feeling for the circuit breaker when the table saw or planer trips the fuse and the lights go out. I now have 3 dedicated 20V circuits with 16 double gang boxes and one single gang box to choose from.
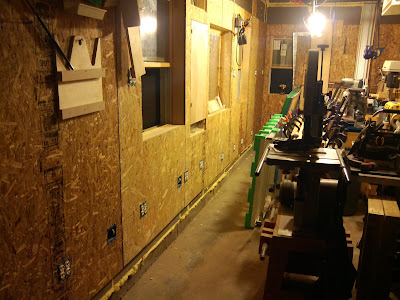 |
| So many nice outlets . . . |
Subscribe to:
Comments (Atom)