Showing posts with label power. Show all posts
Showing posts with label power. Show all posts
Monday, February 10, 2014
My DIY Must Haves Power Tools

Last week one of my readers asked for a list of my must have tools for DIY projects. Since we move every few years (and pay to move most of it) we dont want to have a lot of extra stuff, so we try to keep our DIY supplies to a minimum (which can be hard!)
Today, I thought I would start with power tools, because 1. they are the key to building most things 2. they typically make projects easier and faster!
So here we go!
1. Cordless Drill/Drill Bit Set - We use this for pretty much every project ... for the most part it floats around our home! Cordless is a lot better than corded because it has better mobility. Our drill is a Craftsman from Sears and is still working great after several years ... there are a lot of great drills on the market (I think I would prefer something a little smaller, because it can be a little awkward, but David is fine with the size ...)
2. Jigsaw with wide straight cut blade (on ground in photo) - This is a great compact, versatile saw. Yes, typically used for cutting curves, but with the straight cut blade it can make fairly accurate cuts (not perfect)
Another tip for getting straight cuts is screwing a 1x3 or similar board to the what you are cutting and run the jigsaw along for a guide line, when done remove the screws and admire your cut! (make sure to screw into the part that wont be used)
The jigsaw may not be the correct saw for everything, but can get the job done (for most DIY projects) if you dont have a chop saw or table saw.
3. Dremel tool - has lots of great attachments to cut a variety of things, we mostly use ours to cut small amounts of metal, like the brass tube for the pendant light in the bedroom
4. Chop Saw - You can get by without (depending on the project), but if you are making a lot of straight cuts, this will save a lot of time increase precision! Ours is a Dewalt 12" Double-Bevel Sliding Compound Miter Saw. Since it slides, we can cut up to a 14" board ... we used this to build the sofa table and the tv stand - these projects would of been basically impossible (or taken too much time/not accurate) without it. It is also crucial for cutting 45 angles like the frames for our floating gallery wall (This can be done with a hand saw and miter box, but if doing a large amount, the chop saw will save a lot of time and blisters)
An electric sander is definitely on the list, but I will talk about that with sanding/painting!
And last but definitely not least, below is the safety equipment that we use on a regular basis with these tools

A respirator (dont want to be breathing wood particles in!), Ear muffs to protect hearing while cutting or using the electric sander , and goggles to protect your eyes from flying debris! Thick gloves are also good when handling wood to prevent splinters
In the future? a table saw would be perfect for long cuts and a finish nailer/compressor would be great for upholstering! (I think my hands are going to be tired after finishing the cane chair!)
Ill be back soon to talk about the rest of my DIY list must haves!
--
.JPG)
I primed the cane chair yesterday ... painting up next!
Monday, January 27, 2014
Power In The Shop Only 5 Years Late
Long time readers may remember some of these photos.


It was in the summer of 2008 that I ripped out the sheet rock, insulation and electric from my shop. Though I had every intention of replacing them all quickly, it was not to be. For years I suffered through a shop that had no insulation and almost no electric. My only shop outlet was a single 15 amp outlet on a circuit shared with the shop lights and the hall in the house.
As the removal of the insulation and electric was part of the first phase of my siding project, their replacement languished as the siding project devolved into a multi-year odyssey. It was my friend, +Aaron Marshall, who finally brought me back to the insulation and electric.
Woodworking in America 2011 occurred during the early days of the Wood Whisperer Guild Split-Top Roubo project. Aaron and I were excited about it and talking about workbenches. I explained to Aaron my intention to build a Roubo/21st Century Workbench hybrid from LVL’s and Timberstrand. Though the great hardware available from the WIA vendors was tempting, Aaron convinced me to make even that from LVL and make my own leg vise.
I left WIA excited about my bench and proceeded to begin work on it right away. I had finished the leg vise design by the time the temperature dipped - that’s when I knew the bench had to wait and I began rebuilding the wall.
 |
| My absolute favorite drill for roughing in electrical work. |
Though the rough in of the electric was the first phase, most of the electrical work had to wait until the walls were insulated and sheathed. The insulating work began just after Christmas 2011 and by April of 2012, I was able to begin sheathing the walls. Finally, by April of 2013, the insulation and sheathing work were done and I was able to begin wiring outlets.
 |
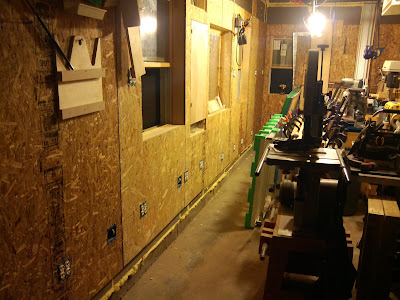
| Ready for sheathing. |
I completed the wiring of the 110V outlets on July 10, 2013. After thinking I was done, finding one I forgot, installing it and then connecting a ground that I’d failed to connect, all of the outlets were live and wired properly. I was even able to use the power detector I made in 7th grade technology to test the outlets.
 |
| Theres Power! |
Next time I’m in the shop I won’t be swapping plugs to switch tools or blindly feeling for the circuit breaker when the table saw or planer trips the fuse and the lights go out. I now have 3 dedicated 20V circuits with 16 double gang boxes and one single gang box to choose from.
 |
| So many nice outlets . . . |
Subscribe to:
Comments (Atom)